Monday, December 12, 2016

Delayed Thanksgiving Post

This year Brent and I decided to stray from our "tradition" of going to the Ramada here in Fargo for thanksgiving day's feast (tasty, filling, no clean up).  Our friends, Aaron and Marcy, were staying in town and she had to work so we planned our Friendsgiving feast and had it ready (or almost ready) by the time Marcy got home from work.

My hands were full of raw meat so I really didn't get many pictures, however, I do have several websites that we got our ideas from.

FIRST!  The potatoes!!  

Brent found a recipe from his girlfriend, Giada De Laurentiis for baked mashed potatoes.  These things.  were.  amazing.

Here's what you'll need:

1 tablespoon butter
4 lbs russet potatoes, scrubbed, peeled and cut into 1-inch pieces
1 cup of whole milk (we used 1%)
1/2 cup (one stick) of butter, melted
1-1/2 cup mozzarella, grated
1 cup grated parmesan
2 tablespoons plain dry bread crumbs
salt and pepper, to taste

First up, preheat your oven to 400˚F and coat a 9x13x2 pan with the 1 tablespoon of butter and set aside.  Then, dice up your potatoes and bring them to a boil in salted water.  You want them all to be similar sized to allow for even cooking.  Cook for about 15 minutes until very tender.


After your potatoes are soft, drain them and return to the pot (if you're like me, you DO NOT use your pots and pans to mix in, so I used a separate bowl) and mash up the potatoes.  


Mix in the milk and melted butter.  Mix in the mozzarella and 3/4 cup of the parmesan cheese.  Season with salt and pepper to taste.


Spread your mashed potatoes evenly into the prepared baking dish and try not to sit and eat them all.  Stir the remaining 1/4 cup of parmesan and the 2 tablespoons of bread crumbs into a small dish and then evenly sprinkle over the potatoes.  Bake uncovered until the topping is golden brown, or about 20 minutes-ish.  

You can actually prepare this up to 6 hours ahead of time and just store it in the fridge (or on the deck if it's cold out 😉). 

No end result picture.  I'd like to blame Brent since he was in charge of taking pictures. 😉


NEXT!  Mom's stuffing!!

Ugh, seriously you guys.  Best.  Stuffing.  Ever.  

I bought a plain bag of dried, cubed bread from the bakery section in the grocery store.  That's how I roll.  If you're my amazing mother, though, you'll cut up your own bread and let it dry out for a couple days ahead of time.

You'll sprinkle your bread crumbs with sage dust (ground sage) or poultry seasoning.  Then you'll melt a stick of butter, and finely mince some onion and celery.  Mom always used the inside part of the celery hearts, with the leaves and stuff.  


Saute that up until everything is soft, adding a little water if it's getting a little too dry.  Then mix your butteronioncelerymix with your stuffing, mixing in a little bit of chicken broth to add more moisture if necessary.  You can either stuff your turkey with it or you can cook it in a tinfoil packet.  Don't put hot/warm stuffing in a cold bird.  Just a heads up, but that should be a given.

This was a spot where I didn't get an end picture of the goods ☹️, but they tasted great! 

SIDES!

I don't know about you guys, but I loves me some cranberry sauce.  I'll eat the stuff from a can, no problem, but I do love to make my own.

I got the recipe online, as I do most of my recipes and this stuff turned out perfectly.

You'll need:
1/4 cup freshly squeeze orange juice
the zest of one orange
1/2 cup of sugar, or more to taste
1-12 oz bag of fresh cranberries
3/4 cup water

In a medium sauce pan heat your water, orange juice, orange zest and sugar until the sugar is completely dissolved.  Stir in your cranberries and bring to a boil.  Then reduce your heat and allow to simmer until it thickens.


NEXT STOP! TURKEY TOWN!

Preheat the oven to 350˚F and get ready...

We spatchcocked that turkey!  Basically, you cut the spine out of the bird, lay it flat, perform chest compressions, cracking the breast bone and then you bake it.  It will bake in HALF the time than the "normal" way of cooking it.  Spatchcocking the turkey allows it to cook more quickly and evenly and it also allows for juicier meat and crispier skin.  Let's be honest... Pretty much everything you want in a turkey. 

Here's a really great video to help you through the process of man handling your turkey.  The video suggests using poultry sheers, I just used some heavy duty kitchen shears that my lovely mama bought me.  I don't have that exact brand, however I do have some knives that are J.A. Henkels and they're the bomb.com.

We hacked our turkey in half and arranged him in a roasting pan and we made this really great herb rub for under the skin.  Here's what you'll need for the rub:

1 golfball sized chunk of onion
1 lemon, scrubbed clean
12 FRESH sage leaves
Large hand full of FRESH flat leaf parsley (about 1/2 cup)
3 tablespoons of extra virgin olive oil
1 teaspoon of salt
6 FRESH bay leaves
4 tablespoons of butter

Put the onion into the bowl of a mini food processor. Zest your lemon, being careful not to cut into the bitter white pith and add the zest to the food processor and reserve the whole lemon for another use. Chop the onion and lemon zest until fine. Add the sage, parsley, olive oil, and 1 teaspoon salt and pulse until it forms a coarse paste.

Put 2 of the bay leaves and the butter into a small pan and heat over medium-low heat until the butter is bubbling. Remove from the heat and set aside.

Being careful not to poke holes in the skin rub your hands under the skin of the turkey and make pockets and then rub the fresh herb paste under the skin.  Brush the bay leaf butter onto the skin of the turkey and occasionally brush the skin throughout baking.  

As it turns out, I had a picture of my hands all up in that bird, Brent took the picture... On his phone... And deleted it.  Go figure.  So you'll just have to take my word for it.  It was pretty epic.

Cooking the bird...

Finished product!

The first time I ever made a turkey and I didn't get nearly enough pictures, more did I get a picture of my plate(s) of food!  Fail blog.

That turkey was so moist and the skin was so amazing.  The rub was seriously incredible.  It would be perfect for a summer feast, too.  Fresh and zesty and incredible.  Just awesome.


You're going to have some leftover turkey - go ahead and use this recipe for some turkey salad (yeah I made that... and, yeah it's super good)  and use some of that leftover cranberry sauce as a spread on the bread along with a little mayo and enjoy those Thanksgiving leftovers for a couple more days!

Saturday, September 24, 2016

Stuffed Bell Peppers with Turkey and Quinoa

This one is super simple and is actually not bad for you!  I found it does make extra filling, but that was actually really good to eat just on its own, too.

Here's what you need:
  • 4 bell peppers halfed length wise, ribs removed
  • 1/2 cup quinoa
  • 1/2 pound grown turkey or ground beef
  • 1 small onion
  • 1 14 oz can fire roasted tomatoes (plain is fine, too, if you can't find fire roasted)
  • 1 7oz can diced green chili
  • 1 14 oz can black beans, drained and rinsed
  • 1 TB taco seasoning (I used half a packet)
  • 1/2 TB cumin (I used a tsp)
  • 1/2 TB olive oil
  • 1/2 cup mozzarella shredded cheese
  • 3/4 cup water


1. Heat olive oil in a large saucepan. Add onion and cook until translucent ( about 3 minutes). Add in meat and cook until browned. Drain any excess grease.
2. Add in black beans, tomatoes, green chilies, water, quinoa, cumin, taco seasoning, salt and pepper if desired. Cover and bring to a boil. Reduce heat to medium/low and simmer for 15 minutes or until quinoa is done. Much of the liquids will cook down.

3. Heat oven to 375˚F. Place peppers in 13 x 9 baking dish and place in oven for 10 - 15 minutes, or just while your oven preheats.  Take the peppers out and spoon in filling and top with grated cheese. Cover pan with foil and bake for 40 minutes.
4. Remove from oven and serve with sour cream or salsa (optional). Enjoy!


Afghan Kebobs with Tomato and Chickpea Stew and Spiced Green Beans with Rice


 The first time I ever tried lamb kofta was in New York at Ariana's Afghan restaurant.  Brent and I enjoyed it so much I decided I wanted to try to make it myself!  We already decided that next time we go to NYC that we're going there again :D


  • 4 cloves garlic, minced
  • 1 teaspoon kosher salt
  • 1 pound ground lamb
  • 3 tablespoons grated onion
  • 3 tablespoons chopped fresh parsley
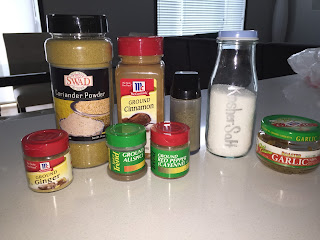
  • 1 tablespoon ground coriander
  • 1 teaspoon ground cumin
  • 1/2 tablespoon ground cinnamon
  • 1/2 teaspoon ground allspice
  • 1/4 teaspoon cayenne pepper
  • 1/4 teaspoon ground ginger
  • 1/4 teaspoon ground black pepper
  • 28 bamboo skewers, soaked in water for 30 minutes


  1. Mash the garlic into a paste with the salt using a mortar and pestle or the flat side of a chef's knife on your cutting board. Mix the garlic into the lamb along with the onion, parsley, coriander, cumin, cinnamon, allspice, cayenne pepper, ginger, and pepper in a mixing bowl until well blended. Form the mixture into 28 balls. Form each ball around the tip of a skewer, flattening into a 2 inch oval; repeat with the remaining skewers. Place the kebabs onto a baking sheet, cover, and refrigerate at least 30 minutes, or up to 12 hours.
  2. Preheat an outdoor grill for medium heat, and lightly oil grate.
  3. Cook the skewers on the preheated grill, turning occasionally, until the lamb has cooked to your desired degree of doneness, about 6 minutes for medium.
(These cook VERY quickly because they are so small - I would probably make them larger next time I make them)


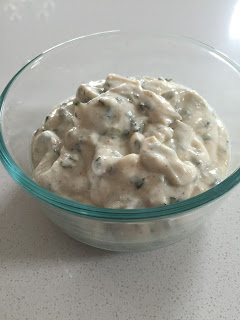
I made a mint yogurt sauce to go with our dinner and to dip our lamb in.  Here's what you'll need:
  • 1 cup Greek yogurt
  • 1/2 cup finely chopped mint leaves
  • 2 medium cloves garlic, minced (about 2 teaspoons)
  • 1 tablespoon fresh juice from 1 lemon
  • 1/2 teaspoon ground cumin
  • 1/4 teaspoon cayenne pepper
  • Kosher salt and freshly ground black pepper

  • Place yogurt, mint, garlic, lemon juice, cumin, and cayenne in a small bowl and stir to combine. Season with salt and pepper to taste. Let sit for 30 minutes, then serve, or transfer to an airtight container and store in refrigerator for up to a week.

I made a couple side dishes - one was green bean saffron and cinnamon spiced rice (called Lubeyeh Puloh).  This turned out so well!


  • 4 Tbsp oil
  • 1 large onion, chopped
  • 2 1/2 cups (1 lb) green beans, chopped (can use frozen)
  • 3 cups water
  • 3 Tbsp tomato paste
  • 1 cup dry basmati rice, soaked 2 hours
  • 1 tsp salt
  • 2 tsp cinnamon
  • 1/8 tsp saffron (optional)


  1. Add oil and onion to a large pot, stirring on high heat until the onions have browned.
  2. Add the beans and water. Cover the pot, bring the beans to a boil, reduce to a simmer and cook until the beans are al dente (~15 minutes).
  3. Add the remaining ingredients. Cover the pot, bring to a boil, reduce to medium and allow the dish to simmer until all the water has been absorbed by the rice ~ 10 minutes. Avoid stirring.
  4. Using the end of a spoon, create several craters in the rice. Then cover the pot by placing a paper towel under the lid. Cook for an additional 15 minutes on low.
  5. Taste test and ensure the rice is al dente. Enjoy while hot!


And I made one more side!  Tomato and Chickpea Stew (Khorisht Nukhut)
  • 2 Tbsp oil
  • 1 onion, chopped
  • 1 cup dry chickpea, soaked overnight (3 cups cooked or 2x 15oz cans)
  • 1 red chili pepper, diced (optional)
  • 1 tsp cumin
  • 2 Tbsp tomato paste (or 1-2 whole fresh tomatoes, chopped)
  • 1 tsp cinnamon

  • If Cooking Chickpeas From Dry

    1. Add all ingredients (except the tomato paste) to a medium pot and add 2 cups water
    2. Allow to come to a boil, reduce to simmer and cover partially while stirring occasionally.
    3. The dish should be ready after 25-30 minutes. Taste test. If cooked, add the tomato paste at this stage. Serve while hot and enjoy!
  • If Cooking Using Canned Chickpeas


    Add all ingredients to the pot at once including 1/2 cup water. Cook at a soft boil for 5-10 minutes, partially covered.


    When cooking dry beans or lentils do not mix an acid (or in this case, the tomato) in with the beans while cooking or the beans will stop cooking.


The spread!

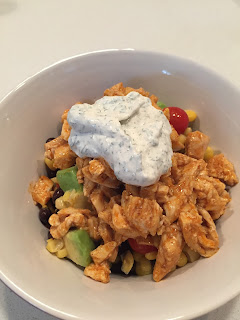
Buffalo Chicken Bowls


  • 1 can sweet corn, drained
  • 1 can black beans, drained and rinsed
  • 2 avocados
  • half a pint of cherry tomatoes, halved
  • 3 chicken breasts
  • 1/2 cup of your favorite buffalo sauce (I used BWW Mild)
  • 1/2 teaspoon garlic, minced
  • 1 packet Hidden Valley Greek Yogurt Dressing
  • 1 1/3 cups plain Greek yogurt
  • 1 1/2 tablespoons milk


  1. Cook chicken, garlic and hot sauce to slow cooker and cook on low for 6 hours or on high for 3 hours. When chicken is cooked through, shred it and set aside. (I just sliced it really thin and cooked on the stove and chopped it)
  2. In a separate small bowl mix together your Hidden Valley Greek Yogurt Dressing, Greek yogurt and milk and stick it in the fridge.
  3. Next, drain and rinse your corn and black beans and add them to a bowl. Rinse and half your cherry tomatoes and add them to the bowl as well. Lastly, dice your avocados and add them to the mix!
  4. Assemble your bowls by adding your veggie mixture, topping with chicken, and finishing them off with some healthy Greek yogurt ranch dressing!


Original Recipe

Sunday, June 12, 2016

Cilantro Lime Chicken with Rice and Black Beans

Rice bowls are quickly becoming one of my new favorite meals.  I found this one and another recipe (that I'll be posting here soon) and they. are. awesome!  They're filling and healthy. Also, cilantro is growing on me.  I always thought it tasted like soap, but in small doses I really, really enjoy it!

Ok, go grab these items:


  • 2 to 3 tablespoons lime zest + more for garnishing
  • 1/3 cup lime juice
  • 1/3 cup honey
  • 2 tablespoons olive oil for sauce + 1 tablespoon for cooking chicken
  • 1/2 teaspoon salt, or to taste
  • 1/2 teaspoon pepper, or to taste
  • 1/4 teaspoon cayenne pepper, optional and to taste
  • about 1 1/4 pounds boneless skinless chicken breasts, diced into bite-sized pieces and seasoned with salt and pepper
  • about 3 cups cooked rice (you could also use two 8.8-ounce pre-cooked Uncle Ben's Original Rice packets)
  • one 15-ounce can black beans, drained and rinsed
  • 1 cup corn (you can use frozen or canned, if you use canned make sure you drain it well)
  • 3/4 cup red bell pepper, seeded and diced small (orange or yellow peppers may be substituted)
  • 3/4 cup cilantro leaves, chopped; or to taste
  1. To a medium bowl or large measuring cup, add the lime zest, lime juice, honey, 2 tablespoons olive oil, salt, pepper, optional cayenne, and whisk to combine; set sauce aside.
  2. To a large skillet, add 1 tablespoon olive oil, add chicken and season with salt and pepper to taste, and cook over medium-high heat for about 5 minutes, flipping intermittently so all sides cook evenly. Cooking time will vary based on thickness of chicken breasts and sizes of pieces. Chicken should be about 90% cooked through. (I won't lie, I didn't follow the recipe very well and I cooked the chicken all of the way through.. Whoops!  Thankfully it turned out just fine.)
  3. Add the sauce, noting that it may bubble up in the first few seconds. Allow sauce to bubble at a medium-fast boil for about 3 to 4 minutes, or until sauce has reduced some and chicken is cooked through. Stir sauce and flip chicken intermittently throughout.
  4. Turn the heat to low and add the rice, black beans, corn, red peppers, cilantro, stir well to combine, and cook until everything is heated through. Taste and check for seasoning balance, making any necessary adjustments (more salt, pepper, pinch of sugar or cayenne, splash of lime juice, etc.) and garnish with a pinch of lime zest before serving. Will keep airtight in the fridge for up to 4 days. Serve cold or reheat gently prior to serving if desired.

I didn't add the black beans, corn, bell pepper and cilantro to the cooking chicken and sauce.  I kind of liked the hot chicken mixed in with the cool rice and veggies.  This is really good reheated.  Also, next time I'd definitely add more black beans and less rice, but you can do whatever you'd like!  That's what's great about cooking some of these meals is that you can really add or omit anything you'd like.  I always recommend going with the recipe first and then changing it up for next time.

This meal serves four and is great for leftovers.

One Pan Pesto Chicken


This recipe was super easy and really delicious.  My mom got me a Veggetti a while ago and I decided it was about time I use it once I found this recipe.  It's like a pencil sharpener, except for your veggies.  Weird, but fun.

Here's what you'll need:

  • 2 tablespoons olive oil
  • 3 skinless, boneless chicken breasts, cut into 2-inch pieces
  • 1 medium red pepper, deseeded and sliced
  • 5 medium zucchini, cut into ribbons or spirals (I used 3 large)
  • 1 pint grape tomatoes, halved
  • ¼ cup pesto homemade or store-bought (I used this stuff, I got it in the pasta sauce section of Cashwise (Coburn's)) and I used the entire 3.5 oz jar instead of wasting the little bit that was left
  • mozzarella cheese, optional (you can get this in the deli section of your grocery store - I got the mozzarella pearls)


Set large pan (I actually used a pot) over medium heat. Drizzle in olive oil. Once the olive oil begins to shimmer, add the chicken pieces and the red pepper (I added a shake or 3 of this stuff, too) and cook, stirring frequently, until the chicken is cooked throughout, about 8 to 10 minutes. Stir in zucchini, tomatoes, pesto, and mozzarella cheese, if using. Serve immediately.

Chipotle Lime Chicken

I've been finding all sorts of great recipes on the Pinterest lately and sticking to our menus we create has been really easy because of it.

I found this recipe for the chipotle lime chicken and actually used breasts instead of the suggested chicken thighs.  Brent and I usually purchase chicken breast in bulk and it works out better that way since we don't have to worry about dealing with bones, skin, etc.

Here's what you'll need:

2-2.5 lbs chicken thighs (or breast)
1/2 cup fresh lime juice (for the love of Pete, don't use the stuff from the bottle)
1 teaspoon fresh lime zest
1/4 cup olive oil
3 tablespoons fresh cilantro leaves, roughly chopped
1 jalapeño, chopped finely (don't get rid of the ribs and seeds unless you're a Sally) ;)
2 teaspoons chipotle chili powder, or more to taste
5 garlic cloves, minced
1 1/2 tablespoons honey
2 teaspoons salt, or to taste
Lime wedges, for serving

Mix everything for the marinade together and pour over chicken in a quart size freezer bag.  Squeeze as much of the air out of the bag as you can and refrigerate for AT LEAST 2 hours.  I marinated the chicken overnight.

Fire up the grill and cook the chicken to 165˚F, brushing on the bits of garlic, jalapeño and cilantro as it cooks.  You could also cook this in the oven @ 400˚F for about 20 minutes, or until cooked though.

I served this with jasmine rice that I cooked with some fresh pineapple juice that I got when I cut up a pineapple and a couple tablespoons of shredded coconut.  Also, this was AMAZING with the fresh pineapple.  Try it out.

Monday, May 2, 2016

Sweet Potato and Black Bean Hash

This recipe was really good and really...  Surprising?  I'm not sure if that's the word I want to use but it was different.  I'm used to sweet potatoes being served with butter, brown sugar and possibly some marshmallows, but this was savory and filling!


Grab these items:

  • 4 Tbsp. olive oil
  • 3 cups diced sweet potatoes (about 2 large potatoes)
  • 1/2 yellow onion, diced (I used probably 1/4 of an onion)
  • 1 red pepper, sliced
  • Salt and pepper to taste
  • 1/2 Tbsp. paprika
  • 1 tsp cumin
  • 2 cups spinach, chopped
  • 1 15-oz. can black beans, drained and rinsed
  • 1 avocado, sliced


  • Heat olive oil on medium heat in a large pan. 

  • Add sweet potatoes, onion, pepper, salt, pepper, paprika, and cumin and stir. 


Cook for 10 minutes, occasionally stirring. 

Add spinach and cook for an additional five minutes. 

  • Lastly, add the black beans and stir until all ingredients are well-blended.


  • Serve up with eggs and avocado or on its own. Enjoy!


Chicken Pot Pie Turnovers

I was finally able to figure out how to get these things to seal off on the edges without it spilling out all over my pan, AND they actually look like turnovers!

I got the recipe from Food Network.
You'll need:  

  • 2 tablespoons butter
  • 1/2 onion, chopped
  • 1 stalk celery, chopped
  • Kosher salt and freshly ground black pepper
  • 2 cloves garlic, minced
  • 2 teaspoons dried thyme (fresh is tasty, too!)
  • 1 tablespoon flour, plus more for dusting
  • 1/2 cup white wine
  • 1 cup chicken stock
  • 1 teaspoon Dijon mustard
  • 1/2 cup frozen peas (I actually just use frozen mixed veggies with corn, peas, carrots and green beans)
  • 1 1/2 cups cubed or shredded cooked chicken
  • 1 sheet frozen puff pastry, thawed (use both sheets, the filling will make enough for 8 turnovers)
  • 1 egg
  1. Preheat the oven to 375˚F.
  2. Melt the butter in a large saute pan over medium heat. Cook the onions and celery with salt and pepper, to taste, until soft, about 10 minutes. Add the garlic and thyme and cook for an additional minute, stirring frequently. Add the flour and cook off the raw flavor, about 1 minute more. Turn up the heat to medium-high and deglaze the pan with the wine. Whisk in the stock and Dijon mustard. Add the frozen veggies and chicken and cook on a very low simmer until the sauce thickens up into a gravy, 5 to 10 minutes. Remove from the heat and set aside.
  3. On a lightly floured surface, unfold the pastry dough and cut into 4 even squares (cut once horizontally and once vertically). Gently roll out each square, increasing the size of the square by about 20 percent. Place the squares on a baking sheet and spoon the chicken mixture in the center. Fold the squares diagonally to create triangles. Pinch the edges together to create turnovers (use a little water if needed to bind). Press the edges with a fork to create a decorative border. Whisk the egg with a splash of water and brush the turnovers with the egg wash. Cut a small slit in the top to allow the steam to escape during baking. Bake the turnovers until golden brown, about 30 minutes. Let cool at least 10 minutes before serving as the insides will be very hot.

***This last time I made it I was completely out of thyme and I used rubbed sage and some marjoram - it turned out pretty well, but the thyme is really amazing.

***I tend to take a little bit of the chicken stock and mix some corn starch in it and pour it in while making the gravy part - for some reason I just could not get it to thicken enough!